Showing posts with label tutorials. Show all posts

Saturday, December 18, 2010

DYI - Christmas wreath with Santas choir table decoration

Many years ago I made this beautiful wreath that I had found in a German magazine. Unfortunately, some time from a leak in the attic humidity drenched the box and it was destroyed. Last year I attempted to rebuild the Santas from felt, but did not have time to finish and  eventually I made the Santas  ornaments for the tree. I hope another time to be able to make it again ;)

You will need:
1. A ready-made wreath natural or synthetic
2. 4 red candles
3. Small gift packets and musical instruments
4. Satin ribbon of your choice 
For the Santas:
1. Styrofoam balls with a diameter of 3.cm5 and 1.5cm
2. An old thick  women pantyhose in skin color
3. Red lipstick
4. Black marker
5. Red marker
6. Red satin fabric 
7. White faux fur or wool fabric or felt
8. Florist's  wire
9. 
White wool yarn for the mustache and beard

10. paper with music notes theme
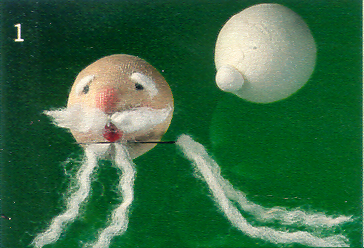
To make the Santa cut the small balls in half and glue on each ball the small half (for the nose). Then cover the ball with a piece of hose and fasten it down with a few stitches. Draw eyes with the black marker and the mouth with the red. With the lipstick gently paint the nose and cheeks. Thread a needle with the white thread and sew a beard and moustache (photo 1). With a little glue fix eyebrows.Stick a long piece of wire in the head with direction from bottom to top in the centre and then turn and pass it back. Twist the two pieces of wire together. Cut a triangle from the red satin fabric (photo 2), stick it on the head and garnish it with fur.Attach the heads on the wreath and  in front of each head attach the little   music sheets. Decorate the wreath with the rest of the candles, bows and ornaments.
And since you are talking about wreaths, take a look at these wonderful ideas about door wreaths I found at  BHG:


Friday, March 19, 2010

Shopping therapy

The spring is coming, the whole nature is singing about it! The flowers have begun to bloom and the birds are singing cheerfully! And with in spring comes also the need for renewal! I made an extensive shopping therapy, first within Etsy and last week I went to the shops! No I did not buy new spring clothes and shoes, to be sincere I didn’t even look at these windows! This winter I managed to gain  five entire kilos and I have decided that I will not buy anything new until I lose them! I bought however various materials in order to experiment with new creations! I bought gorgeous fabrics and felts and made cute brooches!


The fabric flower pins or corsages made intense appearance in this spring  fashion shows and they are a fantastic accessory for decorating  an evening dress, or to  wear on your favorite jacket or it to adopt the style of Sarah Jessica Parker, placing a pin flower above a simple t-shirt.
Tutorial how to make a flower corsage with silk muslin:
1). Cut for the individual petals about 24 recktangles of fabric approximately 7x7 large. You can cut some smaller and some larger pieces. On the top of each piece cut with the scissors formin two curves:


2). Stitch the petals together along the bottom edge using a gathering stitch, one after another, until you have all the petals stung on the thread:
3).Draw the fabric up tightly, creating a flatt circle of petals and tie off:
4).Embellish the flower with a button, or beads:
5).Cut a disc from felt and sew a pinback on it, or cut with the scissors two small lines and pull the pin back through them without sewing :
 6) Glue the disc to the back of the flower with fabric glue and your corsage is ready!

I made this brooch for this week's eurpean team challenge, which is "your favorite traveling destination", chosen by Zsazsazsu!Visit her blog to see all the lovely creations made for this challenge!. I love to travel, and every place on this planet is for me a favorite destination, but I chose Paris, which is a fantastic city, and I have visited three times, but I can never had enough of it!

Saturday, December 27, 2008

Caps for the cold


Caps are in this season, they are also the perfect accessory against cold. They are easy and quick to make, and are a splendid gift idea too.

Simple cap


You will need: 100gr. Yarn, double pointed needles, or circular needles Νο.7-8 mm.
Gauge: 12 sts and 18 rnds = 10x10cm.
Pattern: knit every row
Rib: 1 k, 1p.
Instructions: Cast on 60 sts. Work in rib for 6cm. Cont knitting for 8cm. For the crown-shaping, in the next row slip the 15th stitch to the right needle, knit the 16th and pass slip stitch over knit stitch. Repeat with the 30&31, 45&46 και 60&1. Repeat the same every second row, until you have only 12 st left. Pass a double thread through the 12 st, pull tog tightly and secure end.

Beret


Rib: 1 k, 1p
Stitch: Brioche stitch

1 row= *slip st as if to purl, yarn over,purl 1*, repeat from *


2 row= * knit the slip stitch together with the yarn over, as one stitch, slip st as if to purl, yarn over,purl 1*, repeat from *


3 row= *slip st as if to purl, yarn over, knit the slip stitch together with the yarn over, as one stitch*, repeat from *


We repeat rows 2-3.


Gauge= with needles No.8, 8 st and 20 rnds = 10x10cm.

Instructions: Cast on 54 sts. Work in rib for 4cm with needles No. 7. At the last rnd, in every 3rd knit st increase as following: knit 1, purl 1, knit 1 = 72 st in total.


Change to needles No.8 and continue with the brioche stitch. When we have height of 12cm start the crown-shaping:


*knit together [1 kn,1p,1 kn] together with their yarn-overs, continue 5 st in brioche st, repeat from * 9 times = 54 st.


At 19cm height, at the second rnd of the pattern, knit two st together, then * knit together [1 kn,1p,1 kn] together with their yarn-overs, continue 3 st in brioche st, repeat from * 8 times = 36 st.


At 25cm height, at the second rnd of the pattern, knit two st together, then * knit the slip stitch together with the yarn over, as one stitch, purl 1, repeat from*.


Turn the knitting over, to have the wrong side infront of you. Knit together ever 2 st = 18 st. . Pass a double thread through the 18 st, pull tog tightly and secure end.


And if you don't like or don't know knitting, you can also buy a handmade cap from Etsy:
From left to right:
deepindigo, tonsyn, crazyjaneknits, modestambition, Silvia66, jillroska, Iryna, Nikifashion, SandAndSkyCreations, HotBeads, mymamahat, countingstitches, branda, raghousenternational, katarinacouture, knittingguru

Wednesday, September 10, 2008

Designs for inspiration

I always loved the knitwear and accessories of Benetton. They have lovely bright colors and designs. The new designs for this winter are except from grey and purple, nordic style colorwork, stripes in bright colors and many knit accessories, such as scarfs, neckpieces, necklaces a.o. I was impressed by the scarfs with the loopy stitches and thought to saw you how to make them. You can do loopy stitches either knit or crochet. And besides scarfs, you can decorate sleeves, or collars.  
Loopy stitch with needles
1st row (wrong side) purl. 2nd row: edge st., *Knit 1, Knit 1 but don’t slip the stitch to the right needle, bring the yarn in front of your work, and loop it around your left thumb making a loop 3cm long, hold tight, move the yarn to the back of your work again and knit the stitch of the left needle again, then slip it to the right needle* edge st. Repeat the two rows.


Loopy stitch with crochet hook
Chain the desired number of st. 1st row: single crochet. 2nd row: 1 ch, insert the hook in next sc, put your middle finger before the yarn . Pull the yarn and pull through both loops. Pull your middle finger out of the loop and insert hook in the next sc. Again put middle finger in front of yarn, pull yarn through both loops and continue the same for all the stitches. Repeat row 1 &2.

Monday, August 25, 2008

Scented Sachet tutorial


I bought the Clover's yo-yo maker from Kangaroo (Sofia Vamvaka has exclusiveness of the Clover tools in Greece) and had the inspiration to make small scented sachets with it. It is a very cute small gift or you can put it in your drawers.

 Scented Sachet tutorial


You will need:

1. The Clover yo-yo maker (or you can use a circle from cardboard with diameter 9cm).
2. A piece of silk cloth (or another thin cloth) about 10x10cm.
3. A button
4. Scissors, thread and needle.
5. A ribbon
6. Dried lavender.
1) With the wrong side of the cloth facing up, place the cloth between the disk and the plate and press firmly the aligned disk lines onto the plate protrusions.


2) Cut the cloth, leaving a seam allowance of 3 to 5 mm.

3) Fold the seam towards the disk and hold it with your fingers. Insert the needle from the disk side. Push the needle in through the disk side and out through the plate side. Continue sewing counter clock-wise along the entire circumference while holding dawn the seam with fingers at each stitch. When you reach the end sew the first hole one more time. Don't make a knot yet.
4) Remove the disk from the plate and the cloth from the disk by lifting the seam.

5) Put a small amount of lavender (one tea spoon) in the cloth and close the seam by pulling the thread slowly. Fold the seam inward and neatly make creases.


6) When the opening is closed, make a knot. Fold the ribbon in half and sew it on the middle of the crease. Sew the button on it. Make a bow with the ribbon. Enjoy!


Related Posts Plugin for WordPress, Blogger...